I love fall! It is one of the most wonderful times of the year. I look forward to decorating the house with gourds, pumpkins and fall leaves.
Like most of you, I don’t always like to buy my decorations, I will look for things that I can make myself or make for a lot cheaper. And, those of you who have read the Martha section of my blog before, know that I like to pick crafts to do with the kids. Now, I’d like to say that it’s a great time spent together and that they love doing crafts, but the truth is depending on their mood and whether the gods are on my side that day, is really the deciding factors as to whether or not I am doing the crafts with help or on my own lol.
Regardless, I love doing them. It makes me feel like I have a bit of Martha Stewart in me (even if it is in my own mind) and that she would love my crafts and give me that nod of approval.
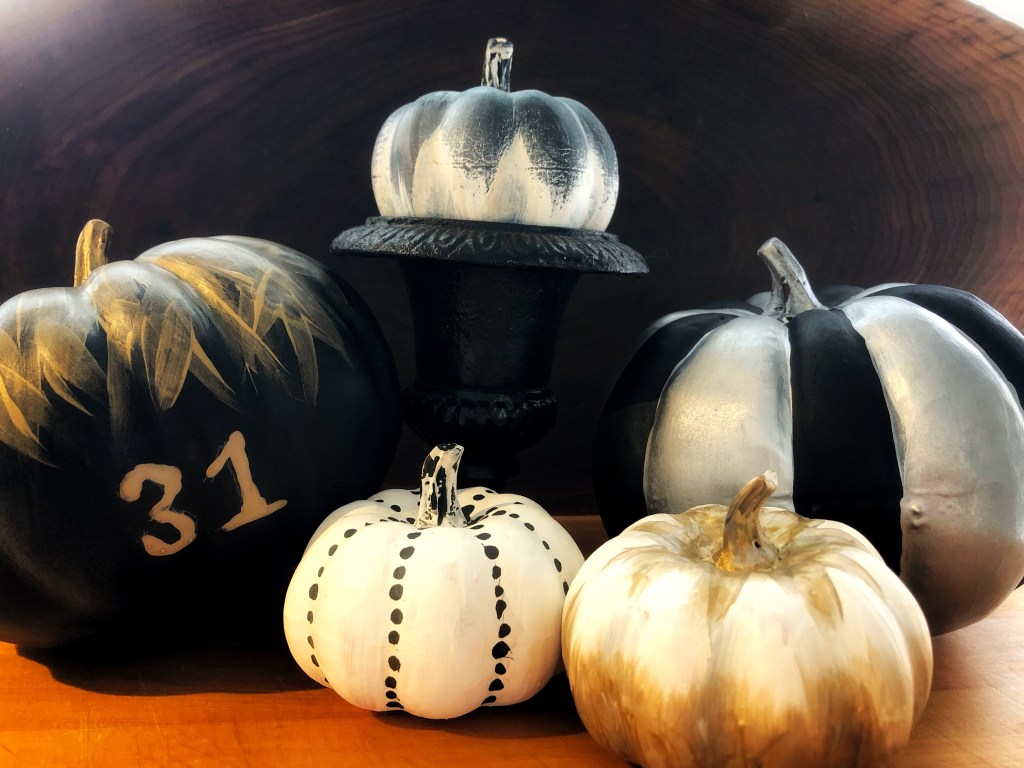
This craft I have to say was a lot of fun. It only cost me $20 and I think I got some cool decorated pumpkins out of it (if I do say so myself). My choice in how I decorated them may not be everyone’s cup of tea and that’s ok. The beauty about decorating your own is that it is your own cool design and you didn’t have to pay a lot to do it. All you need is a bit of paint and an imagination and you can create something cool, unique and one of a kind.
Here is what you will need:
- Plastic pumpkins various sizes (Dollar Store)
- Acrylic Paint in various colours (I used black, white, metallic silver and metallic gold from the Dollar Store)
- Paint brushes (Dollar Store)
- Clear acrylic coating (I used a matte)
- Newspaper to protect the countertop or surface you are painting the pumpkins on

Here is how to make it:
- Lay newsprint on top of the counter or surface to protect from paint
- Paint the dollar store pumpkins a base coat ( I used black and white for my base colours) and let dry.
- Once the paint has dried, check to see if a second coat of paint is needed. If so, paint a second coat and let dry. For the black based pumpkins I had to paint two coats and three for the white based pumpkin.
- Once dried completely, now is time for the fun part – decorating!
Paint designs, patterns, different brush strokes. I use a combination of different brush strokes to layer the paint to create a feather effect or layering the paint. - When you are done decorating the pumpkins, apply a clear coat to protect the paint. Be sure you are in a well ventilated area before spraying. I sprayed mine outside.
- Viola! You are ready to decorate your house with decorations that are one of a kind!
I hope this inspires you to be creative in your home – enjoy!


Leave a comment